


Roast chicken has long been a favorite at dinner tables around the world, celebrated for its comforting qualities and versatility. Whether served for a family gathering or a quiet weeknight meal, a perfectly roasted chicken can evoke feelings of warmth and satisfaction. But what if we could take that classic comfort food and elevate it to new heights? Enter the cider brined roast chicken—a dish that not only retains the cozy essence of traditional roast chicken but also infuses it with a delightful twist that will leave your taste buds dancing.
The Art of Brining
At the heart of this delicious recipe lies the technique of brining. If you’re unfamiliar with the concept, brining involves soaking meat in a solution of water, salt, and other flavor enhancers before cooking. This age-old method serves several purposes, primarily improving the flavor and moisture content of the chicken. When meat is submerged in a brine, the salt and water penetrate the cells via a process called osmosis. As the chicken absorbs the brine, it not only gains flavor but also retains moisture during the cooking process, resulting in a juicy and tender bird.
Brining can be done in two main ways: dry brining and wet brining. While dry brining involves rubbing salt directly onto the meat’s surface, wet brining—which is the method we’ll explore here—creates a flavored liquid bath in which the chicken can soak. This method is particularly effective for larger cuts of meat, like whole chickens, as the brine can fully saturate the meat, enhancing both flavor and texture.
The Unique Twist: Apple Cider
What sets our cider brined roast chicken apart from traditional recipes is the inclusion of apple cider in the brine. The sweetness of the cider balances beautifully with the savory elements of the brine, creating a harmonious blend of flavors. As the chicken soaks in this aromatic mixture, it absorbs the subtle sweetness of the cider, which enhances the overall taste profile of the dish. The result is a roast chicken that is not only succulent but also carries a hint of fall-inspired flavors that are both inviting and delicious.
Understanding the Brining Process
Before diving into the recipe, it’s crucial to understand how brining works and why it’s beneficial for cooking chicken. As mentioned earlier, the science behind brining involves osmosis. When the chicken is placed in a saltwater solution, salt ions move into the meat while water molecules move in the opposite direction, creating a balance. This process allows the chicken to absorb moisture, which is especially crucial during the cooking process, where some moisture is inevitably lost.
In addition to improving texture and moisture retention, brining also enhances the flavor of the chicken. The salt in the brine breaks down some of the proteins in the meat, allowing for better flavor absorption. Furthermore, by adding ingredients like apple cider, herbs, and spices to the brine, you can infuse the chicken with a depth of flavor that would be nearly impossible to achieve through seasoning alone.
Types of Brines: Wet vs. Dry
While both wet and dry brining have their merits, wet brining is particularly advantageous for our cider brined roast chicken. With a wet brine, the chicken is fully submerged in the flavorful liquid, allowing for even distribution of flavors throughout the meat. This method is especially beneficial for larger cuts, ensuring that every bite is as delicious as the last. Dry brining, on the other hand, is simpler and can be done without the need for a large container, but it may not provide the same level of moisture retention as wet brining.
Ingredients Breakdown
Now that we’ve explored the brining process, let’s take a closer look at the ingredients that make up our cider brined roast chicken. Each component plays a vital role in creating the perfect balance of flavors.
– Apple Cider: The star of the show, apple cider brings a natural sweetness that enhances the roast chicken’s flavor. Its acidity helps tenderize the meat, making it juicy and flavorful.
– Kosher Salt: Essential for the brining process, kosher salt helps draw moisture into the chicken while also seasoning it throughout. Its larger crystals make it easy to dissolve in water and ensure even distribution.
– Brown Sugar: Adding a touch of sweetness, brown sugar complements the apple cider and helps create a beautifully caramelized skin when roasted.
– Fresh Herbs (Thyme and Rosemary): These aromatic herbs contribute to the overall flavor profile of the chicken. Thyme adds an earthy note, while rosemary lends a pine-like fragrance that pairs beautifully with roasted meats.
– Spices (Black Peppercorns and Cinnamon): Whole black peppercorns infuse warmth and depth, while a touch of cinnamon adds a surprising note that enhances the seasonal flavors of the dish.
– Stuffing Ingredients (Apple and Onion): For an extra layer of flavor, we will stuff the chicken with apple and onion before roasting. As the chicken cooks, these ingredients will release their juices, further enriching the meat and adding a delightful aroma.
Step-by-Step Instructions for Cider Brined Roast Chicken
Preparing the Brine
Creating the brine is the first step in this delightful culinary adventure. Here’s how to prepare it:
1. Gather Your Ingredients: You will need 4 cups of apple cider, 1/2 cup of kosher salt, 1/4 cup of brown sugar, 1 tablespoon of whole black peppercorns, 2 sprigs of fresh thyme, 2 sprigs of fresh rosemary, and 1 stick of cinnamon.
2. Combine Ingredients: In a large pot, combine the apple cider, kosher salt, brown sugar, black peppercorns, thyme, rosemary, and cinnamon. Stir until the salt and sugar have dissolved.
3. Heat the Mixture: Place the pot over medium heat and bring the mixture to a simmer. This step helps to infuse the flavors of the herbs and spices into the brine.
4. Cool the Brine: Once the brine has simmered for about 5-10 minutes, remove it from the heat and let it cool completely. It’s essential to allow the brine to cool before adding the chicken to prevent cooking it prematurely.
Brining the Chicken
Now that your brine is ready, it’s time to brine the chicken:
1. Prepare the Chicken: Rinse the whole chicken under cold water and pat it dry with paper towels. Ensure that the cavity is clean and free of any giblets.
2. Submerge the Chicken: In a large container or a resealable plastic bag, pour the cooled brine over the chicken, making sure it is fully submerged. If necessary, you can weigh the chicken down with a plate or other heavy object to ensure it stays in the brine.
3. Refrigerate: Seal the container or bag and refrigerate for at least 4 hours, but ideally overnight. This allows enough time for the flavors to penetrate the meat and ensures a juicy result.
As the chicken brines, the flavors meld beautifully, creating a deliciously seasoned and moist roast chicken. In the next part of this article, we will explore the actual roasting process, including tips for achieving that perfect golden-brown skin and juicy meat. Stay tuned for the delicious conclusion to our cider brined roast chicken journey!
Best Practices for Submerging the Chicken
To ensure that your chicken absorbs the rich flavors of the cider brine, it is essential to fully submerge the bird in the brining solution. The key to achieving even absorption is to use a large enough container—such as a food-safe bucket or a large resealable plastic bag. If using a bag, remove as much air as possible before sealing to ensure the brine is in full contact with the chicken.
For optimal results, use a brine that is cool to the touch. Place the chicken breast side down in the brine, ensuring that the cavity is filled with the liquid. If necessary, weigh the chicken down with a plate or a heavy object to keep it submerged. This practice allows the salt and flavors to penetrate the meat uniformly, resulting in a juicier and more flavorful roast.
Recommended Brining Time
The brining time significantly influences the final outcome of your cider brined roast chicken. A minimum of 4 hours is recommended for a flavorful brine, but if time permits, brining for 12 to 24 hours will yield superior results. The longer brining period allows the flavors from the cider, herbs, and spices to deeply infuse the meat. However, be cautious not to exceed 24 hours, as over-brining can lead to a mushy texture.
Roasting the Chicken
Preheating the Oven
Preheating your oven to the correct temperature is crucial for achieving perfectly crispy skin on your roast chicken. Set your oven to 425°F (220°C), which allows the skin to crisp up beautifully while cooking the meat evenly. A hot oven helps to render the fat beneath the skin, creating a golden and delicious exterior.
Preparing the Chicken
Once the chicken has finished brining, it’s time to prepare it for roasting. Start by removing the chicken from the brine and discarding the brining liquid. Rinse the chicken under cold water to remove excess salt and any spices that may be clinging to the skin. Pat the chicken dry thoroughly with paper towels; this step is essential as moisture on the surface can prevent the skin from crisping up during roasting.
Stuffing the Chicken
For added flavor, consider stuffing the cavity of the chicken with aromatics such as quartered onions, halved lemons, garlic cloves, or fresh herbs like rosemary and thyme. These ingredients not only enhance the flavor but also help to keep the chicken moist during cooking by steaming from the inside. The combination of brine and stuffing creates layers of flavor that elevate the dish.
Seasoning and Cooking
Techniques for Seasoning the Chicken
After preparing the chicken, it’s time to season it. Generously sprinkle kosher salt and freshly cracked black pepper over the entire surface of the chicken. A light drizzle of olive oil can also be applied to promote browning. You can experiment with other seasonings such as paprika, garlic powder, or even a blend of herbs to add your personal touch.
Guidelines for Roasting
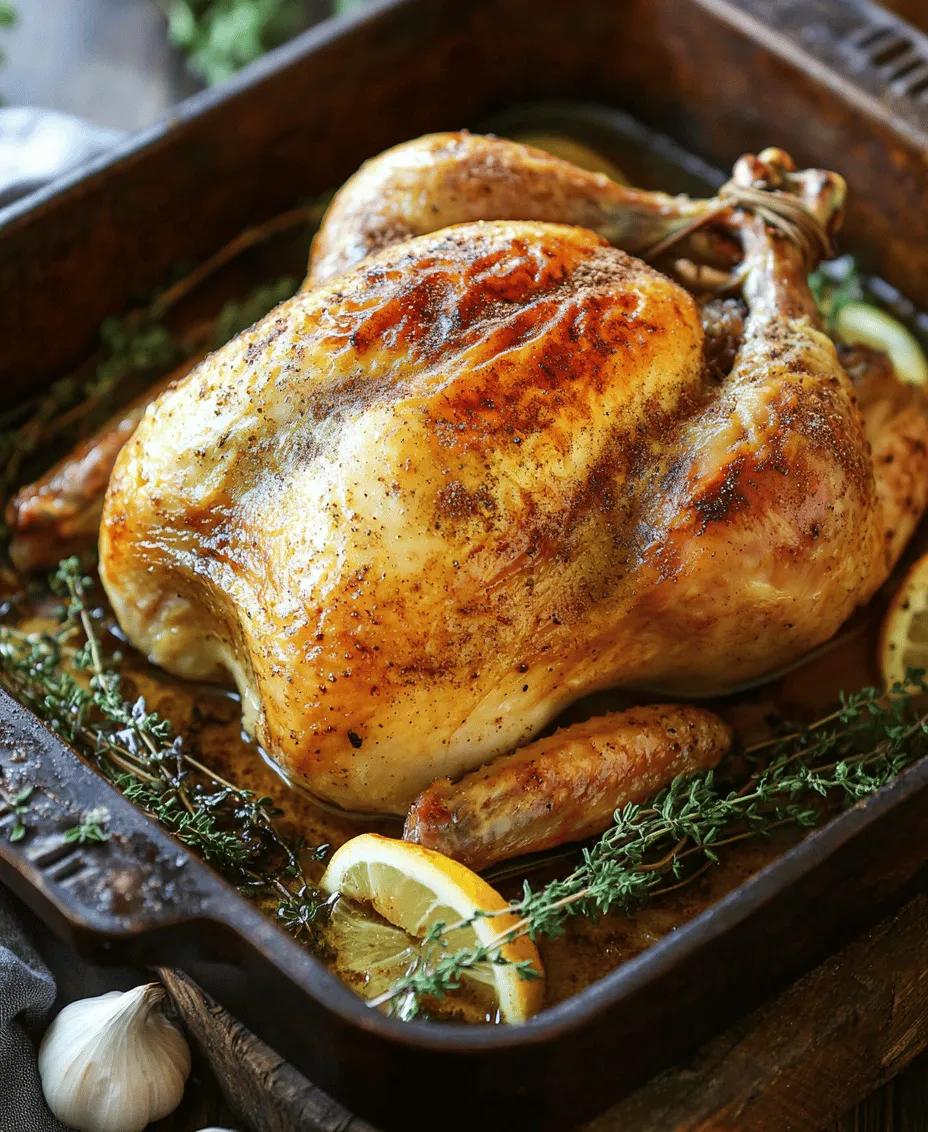
Place the chicken in a roasting pan, breast side up, and transfer it to the preheated oven. Roast for approximately 20 minutes per pound, or until the internal temperature reaches 165°F (74°C) in the thickest part of the thigh, away from the bone. To ensure even cooking, consider rotating the pan halfway through the roasting process. Use a meat thermometer for accuracy and avoid cutting into the chicken to check doneness, as this can lead to loss of juices.
Resting and Carving
Importance of Resting the Chicken
After successfully roasting your chicken, allow it to rest for at least 15-20 minutes before carving. Resting is a vital step that allows the juices to redistribute throughout the meat. If you carve the chicken too soon, the juices will run out, resulting in a dry roast. During the resting period, cover the chicken loosely with aluminum foil to keep it warm.
Tips for Properly Carving the Chicken
To carve the chicken, start by removing the legs and thighs. Use a sharp carving knife to cut through the joint that connects the leg to the body. Next, remove the wings in a similar manner. For the breast meat, slice it off the bone by making a clean cut along the breastbone and following the curvature of the rib cage. Serve the carved chicken pieces on a platter, arranging them attractively for your guests.
Serving Suggestions
When it comes to serving cider brined roast chicken, the options are plentiful. This dish pairs wonderfully with a variety of side dishes that complement its flavors. Consider serving it alongside roasted seasonal vegetables, such as carrots, Brussels sprouts, or potatoes, which can be cooked in the same oven for convenience.
For a fresh contrast, a vibrant salad made with mixed greens, sliced apples, and a tangy vinaigrette can provide a refreshing balance. Additionally, consider serving a creamy garlic mashed potato or a wild rice pilaf that can soak up the juices from the chicken.
Sauces and Drizzles
Elevate your dish further with sauces or drizzles. A simple pan sauce made from the drippings can enhance the flavor profile significantly. To make the sauce, deglaze the roasting pan with a splash of chicken broth or white wine, scraping up any browned bits, and reduce it until slightly thickened. Alternatively, a homemade apple cider reduction can add a sweet and tangy element that harmonizes beautifully with the chicken.
Nutritional Information
Roast chicken is not only delicious but also offers a variety of health benefits. A standard serving of roasted chicken (approximately 3.5 ounces) provides around 25 grams of protein, making it an excellent source of lean protein for muscle maintenance and overall health. When brined, the sodium content can be slightly elevated; however, the brining process also enhances the flavor without needing to add excessive salt during cooking.
From a dietary perspective, roast chicken is versatile and can fit into various dietary plans, including low-carb and keto diets. For those mindful of sodium intake, consider adjusting the brining time or experimenting with low-sodium options for the cider.
Conclusion
Cider brined roast chicken is more than just a meal; it’s an experience that brings warmth and joy to family gatherings and special occasions. The meticulous brining process, combined with the aromatic roasting, creates a dish that is both flavorful and visually appealing. By following the steps outlined above, you can transform a simple roast chicken into a culinary masterpiece that will impress your family and friends.
This recipe not only elevates traditional roast chicken but also introduces a unique flavor profile that is sure to become a favorite in your household. So roll up your sleeves, gather your ingredients, and dive into the delightful world of cider brined roast chicken; your taste buds will thank you!
